Tuesday, July 2, 2013

Totally Un-PC Mommy Confession: I Hate Breastfeeding

OK, so I know this post is going to be all about something people don't want to hear and I should probably watch out for angry mobs storming my house with fire and pitchforks. I know breastfeeding is best for the baby health-wise and bonding, etc. and that is why I do it, but if I'm being totally honest, I absolutely HATE it.

So far my experience with my newborn daughter has been just about the same as my previous experience with my now-3-year-old son. And I remember hating it then too. Here are my reasons:

1. The first month, give or take, is painful. My nipples hurt whenever the baby starts to eat. It usually subsides within a few seconds, but that initial latch is never pleasant. I also have a fast let-down and the baby will "bite down" to slow it down. Ouch, ouch, ouch!

2. Both the baby and I am getting used to a schedule and adjusting milk levels. I tend to overproduce (which is ironic to me, since I can't seem to keep up supply after stretching it to 6 months), which causes a lot of issues with the baby eating mainly leading to reflux problems. We deal with a LOT of spit up, which is both a cleanliness issue and also stresses me out because I get paranoid about how much they are actually getting to eat.

3. As convenient as it is always having milk ready to go, it is just as inconvenient being the ONLY source of nutrition for the baby. No matter where we are or what we are doing, I am the only one who can feed the baby. Wouldn't I love to sleep all night and have the hubby get up and feed her? Even if I did pump and had someone else give her a bottle, if I skip a feeding, my boobs get really full and extremely sore. Not. Fun.

4. Cluster feeding is the worst. My son did this occasionally, but my daughter is only 5 days old and we've already had two rounds of it. Feeding her on demand every hour is exhausting. It's like I just plant myself on the couch and without being able to move anywhere because I know I'm going to have to feed her again soon. As if I don't feel enough like a cow/milk machine...

No matter how I feel about nursing, I choose to do it exclusively because it is the healthiest choice for my baby. I know the long-term effects are worth going through every single item I mentioned above and even more that I probably am forgetting right now. It is also a financial decision. Babies aren't cheap, so with one less expense without having to buy formula is a BIG bonus for us.

Not to mention the selfish reasons I do it as well, as so humorously outlined here

June 27, 2013

So blessed...

Kathryn Grace


Sunday, June 16, 2013

To a father no longer here

My dad has always had a huge impact on me and how I make my choices in life. There's no doubt about it that he is a great man.

This post, however, is about a dad no longer with us. My husband's dad passed away a little over 5 years ago from a all-too-quick acting brain tumor. It was a sad time for everyone.

He was my ice cream buddy; he was always ready with words of wisdom; he was wise and funny if not hidden behind a calm and still demeanor. 

So much of what makes my husband who he is comes from direct influence from his father. I only wish I had had more time to get to know him and that he could be around to meet his grand kids (the oldest grandchild was just a newborn when he passed).

I do like to think of him watching over his grand kids and that he perhaps had some sort of hand in us being chosen as their parents. 

We may have lost a good man on earth 5 years ago, but heaven gained a good soul to watch over us all.

Wednesday, June 12, 2013

The slooooow countdown to Maternity Leave

When I was pregnant with JJ, I took off for my Maternity Leave from work two weeks before he was due.  This time I decided I'd be OK to just give myself one week.
 
Big mistake.
 
I am way too uncomfortable and I cannot concentrate on anything except the fact that I am so uncomfortable and going to the bathroom every 20 minutes (has it always been that far down the hallway?) and so close to being done and oh, wait... is that a real contraction or a practice one? 
 
I really, really, really should not be here. I'm not doing anyone any good.
 
Oh, well. Two more days then I'm off.  Then this little girl can make her debut right away and I can enjoy every possible minute with her while I'm on leave.
 
Oh if it were a perfect world...

Wednesday, May 22, 2013

A year of Disney Fun

For my birthday last year, I was lucky enough to get a Disneyland pass and JJ and I have been taking full advantage of that for the last year!! It was really nice, especially during football season when the hubby would go into full "Man Cave" mode and revel in his sports glory. JJ and I would hit the road to Anaheim and have fun at the park.  It was really nice when my parents also got passes and they would meet up with us.

I grew up a total Disney kid and I loved that I could pass that onto my son. When we found out I was pregnant with Baby #2 in October, I knew our Disney Days would be numbered, but we kept going as long as we could.

This past Sunday we decided to do one last family Disney Day at California Adventure because the hubby had never been.  It turned out to be a great afternoon, but one my 35 week preggo body did NOT appreciate. Recently, I think Baby Kathryn has set up camp on my sciatic nerve and it is painful to move too much or walk too much. I do still have another month on the pass, but I'm just not sure if I'm going to be able to do it.

I'm sad that it's coming to an end (for now), but I've loved every minute of sharing the Disney Magic with JJ and seeing him get more and more excited about going as he's grown up so much over the last year.


I am so blessed to be his mommy and I can't wait until we can share this experience again with Kathryn in a couple years!

Boppy Covers

I wanted cute boppy covers so I decided to make my own.

I used my old boppy cover from when JJ was a baby as a pattern.  I lfolded my material in half since you need two sides and cut around the old cover, leaving about a 1/2" for a seam allowance. 
Measure from the top of your pattern cover to the zipper and make that some cut on one piece of your fabric. (Trust me when I say just do one piece. I'm not going to tell you how I know it is a total pain to try to sew back together the piece that wasn't supposed to be cut.)
Now sew on your zipper. Open the zipper and sew one side of the zipper to one side of your fabric then do it again for the other side. Just make sure your zipper is facing the right way.


Then put your two fabric pieces, right sides together and sew all the way around. Since you have the zipper now, you don't need to leave yourself a place to turn it right side out when you are done. Make sure your zipper is closed for this step and make sure you catch the ends of the zipper on your way around.

 Turn the cover right side out and put it on your boppy! They are so easy to do; I made 5 in one afternoon! And they can be whatever material you want. No reason not to do it!! :0)


Rag Quilt

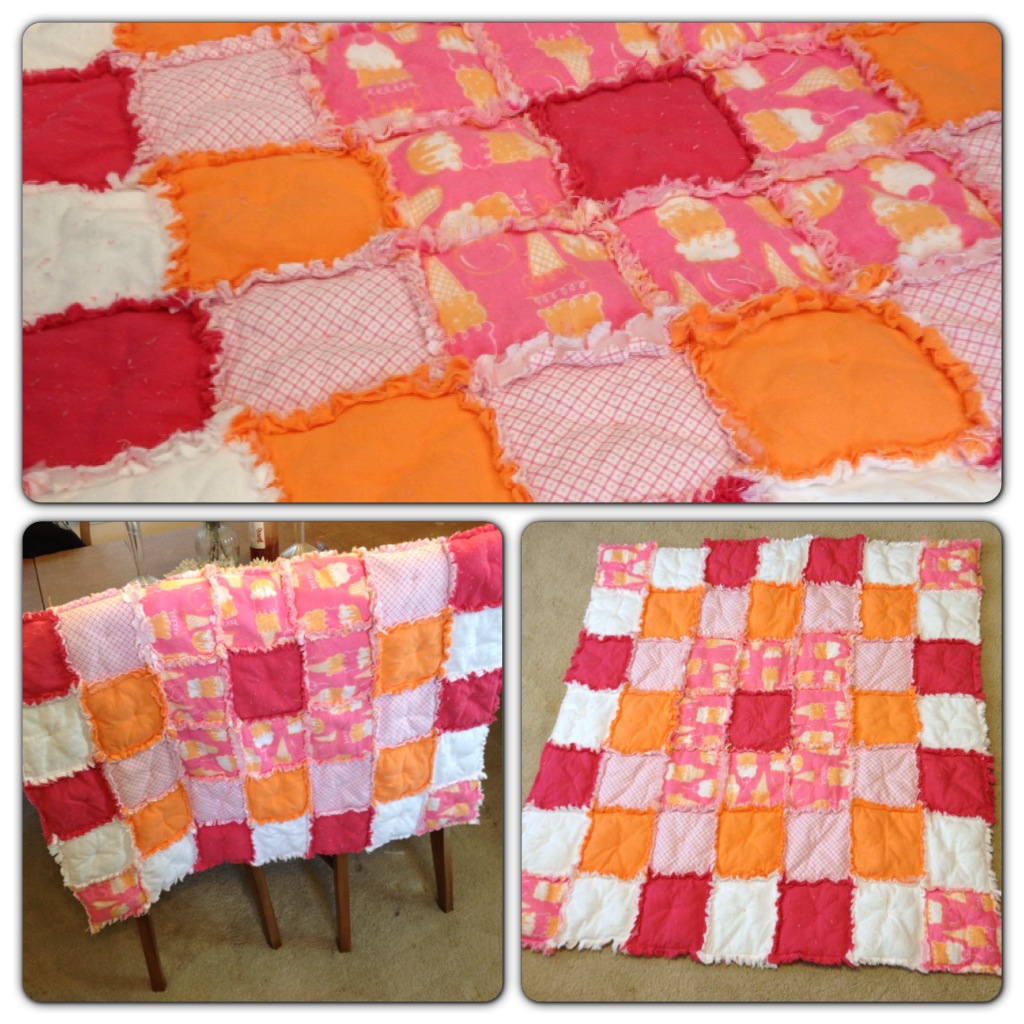
So I've made a few of these now and each time I forget how much work is involved! But the end result it totally worth it!

The ones I made before were queen size and I used 2 yards of each kind of fabric. This one was meant to be smaller since it is for a tiny human. I only got about 1 yard of each kind of fabric. I used all flannel for this one and I really think that turns out better, but you can use anything else, just as long as its cotton.  If you don't know how much fabric to get, just figure out how many squares you want it to be and how big each square should be. I cut my squares to 6x6 and it ended up being 7 squares x 7 squares, so 42"x42". You will also need batting. I got 100% polyester batting, but I don't really love working with it. If you can get the softer bamboo batting, it is MUCH better.  Cut those squares too, 1" less than your fabric squares.

1. Sandwich the batting between two fabric squares and lay out your pattern. The hubby and I went through a couple different options before we settled on a good lay-out.
2. Sew each square sandwich together. Usually, you would use your machine and sew a big X in the middle of each one. I didn't want to do that for this quilt, so I just hand-stitched a tiny little x in the middle and it worked just fine. The point is for each square to hold together.

3. Once your squares are put together, you are ready to put together your rows. Just follow the pattern you decided on. I recommend taking a photo of that like I did, so you have a good reference in case your squares get mixed up, which mine did.

Since you want the rough edges to show, sew them "backs" together along one edge. Keep going with each square until you have a row. Then do the rest of the rows.


4. Follow the same instructions, but now you are sewing the rows together. Make sure to match up the squares as much as possible. If they are a little off, it's fine. It'll turn out OK when you do the "rag" step.

6
I would recommend giving yourself a lot of room for this, especially if you are doing a larger quilt. You will need room to feed through the sewing machine and you'll need room to the left as you add each row. I was fine for this smaller quilt, but when I made the queen size, I had to have my hubby hold onto the overflow.

5. Once you have all the rows sewed together, do a final stitch around the outer edge of the quilt to close it out. You can use a regular straight stitch, but I like to use the zig-zag stitch. It holds it nicely and provides a decorative element since it will be seen.
6. This is the worse part, I'm not going to lie. You need to go around and cut little snips out of all the raw edges you have exposed. All the way around the outside and each square inside. This takes awhile and more often than not, my index finger will get a small blister and start to go numb. Again, this is where it helps to have someone available to take over if you can. Usually I get the hubby to help, but this time my 3-year-old eager beaver helper wanted in. Since I was using my big fabric scissors and not his usual safety scissors, I did it with him for a couple squares before he gave up. He really wanted me to share though. ("You don't have your scissors here, JJ." "Share, mommy. Please." I couldn't say no...)

7. Last step! Wash your quilt. When you wash and dry it, all those exposed edges start to curl up and get all raggy. Hence "Rag Quilt"! It is a cute way to make a quilt and pretty easy not to mess up. I'm a really lazy pinner and measurer so this is perfect for me!