Showing posts with label baby girl. Show all posts

Wednesday, May 22, 2013

Boppy Covers

I wanted cute boppy covers so I decided to make my own.

I used my old boppy cover from when JJ was a baby as a pattern.  I lfolded my material in half since you need two sides and cut around the old cover, leaving about a 1/2" for a seam allowance. 
Measure from the top of your pattern cover to the zipper and make that some cut on one piece of your fabric. (Trust me when I say just do one piece. I'm not going to tell you how I know it is a total pain to try to sew back together the piece that wasn't supposed to be cut.)
Now sew on your zipper. Open the zipper and sew one side of the zipper to one side of your fabric then do it again for the other side. Just make sure your zipper is facing the right way.


Then put your two fabric pieces, right sides together and sew all the way around. Since you have the zipper now, you don't need to leave yourself a place to turn it right side out when you are done. Make sure your zipper is closed for this step and make sure you catch the ends of the zipper on your way around.

 Turn the cover right side out and put it on your boppy! They are so easy to do; I made 5 in one afternoon! And they can be whatever material you want. No reason not to do it!! :0)


Rag Quilt

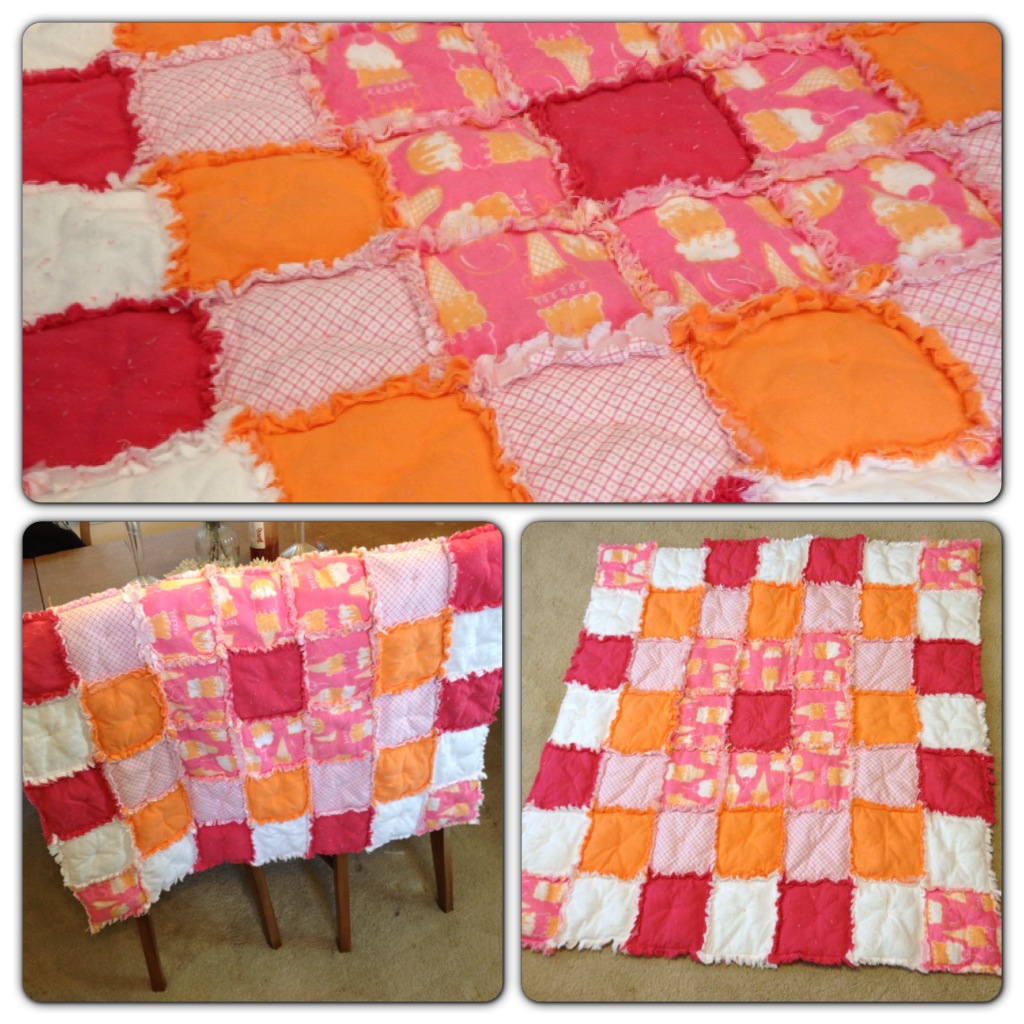
So I've made a few of these now and each time I forget how much work is involved! But the end result it totally worth it!

The ones I made before were queen size and I used 2 yards of each kind of fabric. This one was meant to be smaller since it is for a tiny human. I only got about 1 yard of each kind of fabric. I used all flannel for this one and I really think that turns out better, but you can use anything else, just as long as its cotton.  If you don't know how much fabric to get, just figure out how many squares you want it to be and how big each square should be. I cut my squares to 6x6 and it ended up being 7 squares x 7 squares, so 42"x42". You will also need batting. I got 100% polyester batting, but I don't really love working with it. If you can get the softer bamboo batting, it is MUCH better.  Cut those squares too, 1" less than your fabric squares.

1. Sandwich the batting between two fabric squares and lay out your pattern. The hubby and I went through a couple different options before we settled on a good lay-out.
2. Sew each square sandwich together. Usually, you would use your machine and sew a big X in the middle of each one. I didn't want to do that for this quilt, so I just hand-stitched a tiny little x in the middle and it worked just fine. The point is for each square to hold together.

3. Once your squares are put together, you are ready to put together your rows. Just follow the pattern you decided on. I recommend taking a photo of that like I did, so you have a good reference in case your squares get mixed up, which mine did.

Since you want the rough edges to show, sew them "backs" together along one edge. Keep going with each square until you have a row. Then do the rest of the rows.


4. Follow the same instructions, but now you are sewing the rows together. Make sure to match up the squares as much as possible. If they are a little off, it's fine. It'll turn out OK when you do the "rag" step.

6
I would recommend giving yourself a lot of room for this, especially if you are doing a larger quilt. You will need room to feed through the sewing machine and you'll need room to the left as you add each row. I was fine for this smaller quilt, but when I made the queen size, I had to have my hubby hold onto the overflow.

5. Once you have all the rows sewed together, do a final stitch around the outer edge of the quilt to close it out. You can use a regular straight stitch, but I like to use the zig-zag stitch. It holds it nicely and provides a decorative element since it will be seen.
6. This is the worse part, I'm not going to lie. You need to go around and cut little snips out of all the raw edges you have exposed. All the way around the outside and each square inside. This takes awhile and more often than not, my index finger will get a small blister and start to go numb. Again, this is where it helps to have someone available to take over if you can. Usually I get the hubby to help, but this time my 3-year-old eager beaver helper wanted in. Since I was using my big fabric scissors and not his usual safety scissors, I did it with him for a couple squares before he gave up. He really wanted me to share though. ("You don't have your scissors here, JJ." "Share, mommy. Please." I couldn't say no...)

7. Last step! Wash your quilt. When you wash and dry it, all those exposed edges start to curl up and get all raggy. Hence "Rag Quilt"! It is a cute way to make a quilt and pretty easy not to mess up. I'm a really lazy pinner and measurer so this is perfect for me!



Project 3: Crafting for Baby Kathryn's room

 I actually saw a lamp I really liked for Kathryn's room, but it was very expensive. I had already purchased quite a bit of this cute princess fabric for a project I ended up abandoning, so that is what inspired me to do this lamp recovering.

1. I bought a fairly cheap lamp at Target
2. I removed the pom-poms at the bottom of the top tier. Since these shades are perfectly round, it was easy enough to just measure it around directly and cut out the piece I needed.  I had to double up my fabric because it was a bit thin and you could see the original pattern through it. I laid the fabric in place and hot glued all the way around and up the crease.

3. I repeated the process for the bottom shade too.  Pretty cute, right?


Project 2: Crafting for Baby Kathryn's Room

This one is even easier than the first one!

To make this cute little silhouettes, I just did a Google image search for the character and "silhouette." I printed it out and used them as stencils to cut out of the colored cardstock I wanted.  Then I just framed them.

The cool thing about this particular "craft" is that the frames I used were from JJ's room before we changed it from Dr. Seuss to Superheroes.  I just sanded off the color and repainted them Cream. I didn't really think it was going to work at first, but it did and I was so happy with it!

Project 1: Crafting for Baby Kathryn's room!

The first project I made for my upcoming little girl's room was a canvas initial.  This was a super easy project.

1. Just get a canvas the size you want. The one I used is 8x8 and I picked it up pretty cheap at Aaron Brothers. I think you can get them at Michaels too.
2. Paint it the color you want.
3. Add the initial in a different material. I've seen people use buttons and that is SUPER cute. I had these little flowers in my scrapbooking stuff, and they were the perfect color.
4. Definitely lay out your letter first. That way you get the spacing right and you know it will look like how you want it to look.

5. Once you have it mapped out, take it off the canvas and brush on some Mod Podge. Just do small sections at a time so it doesn't dry out.


Anytime you can get your 3-year-old to "help" I highly recommend it. It really helps things move along nicely :0)
 
 6. After I had Mod Podged my canvas and added a few decorative details, I had my handy hubby drill a couple holes in the top so I could hang it.

7. Hang it up and admire your work!  What do you think?